Skip the manual plugin installation with no-code Backstage
Installation steps
Install the plugin.
cd packages/app
yarn add @backstage/plugin-graphiql
Add a new route for the GraphiQL page.
// packages/app/src/App.tsx
import { GraphiQLPage } from '@backstage/plugin-graphiql';

const routes = (
  <FlatRoutes>
    ...
    <Route path="/graphiql" element={<GraphiQLPage />} />
    ...
  </FlatRoutes>
);
Create an ApiFactory for the GraphQL API you want to query from the GraphiQL page.
// packages/app/src/apis.ts
import {
  AnyApiFactory,
  createApiFactory
} from '@backstage/core';
import {
  graphQlBrowseApiRef,
  GraphQLEndpoints
} from '@backstage/plugin-graphiql'

export const apis: AnyApiFactory[] = [
  createApiFactory({
    api: graphQlBrowseApiRef,
    deps: { },
    factory: () =>
      GraphQLEndpoints.from([
        // use the create function to connect an unauthenticated GraphQL API
        GraphQLEndpoints.create({
          id: 'gitlab',
          title: 'GitLab',
          url: 'https://gitlab.com/api/graphql',
          headers: { 'Some-Key': 'Some-Value' }
        })
      ])
  })
];
Add a link to the sidebar.
// packages/app/src/components/Root/Root.tsx
<SidebarItem icon={ExtensionIcon} to="/graphiql" text="GraphiQL" />
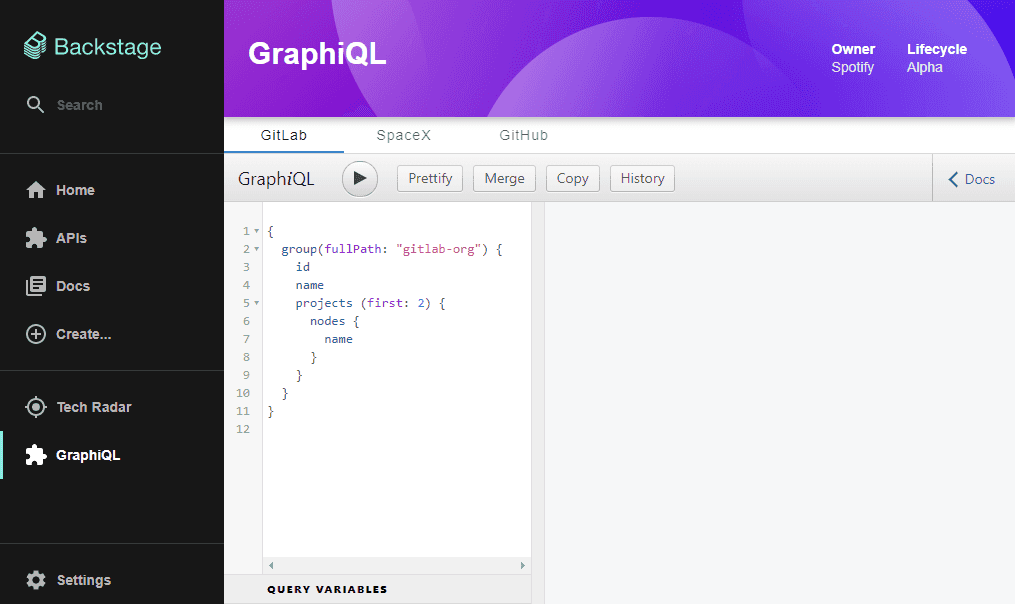
Select the GraphiQL link on the sidebar, select an API tab and start submitting GraphQL queries.
Found a mistake? Update these instructions.
Things to know
Adding multiple GraphQL APIs
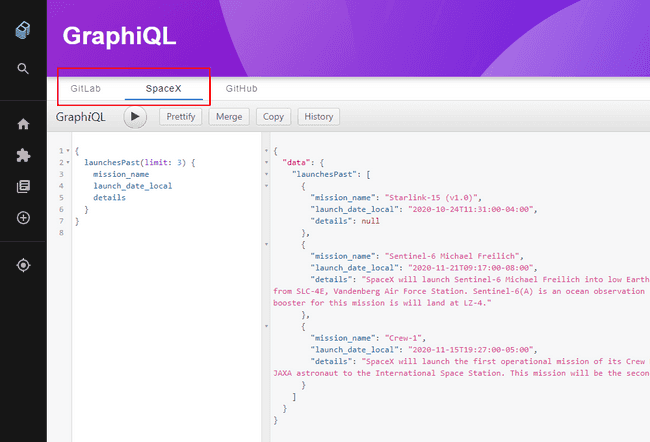
Multiple APIs can be connected to the GraphiQL page. Each GraphQLEndpoint added to the API factory in apis.ts is rendered as a seperate tab. For example, let’s add a second API:
  createApiFactory({
    api: graphQlBrowseApiRef,
    deps: { },
    factory: () =>
      GraphQLEndpoints.from([
        GraphQLEndpoints.create({
          id: 'gitlab',
          title: 'GitLab',
          url: 'https://gitlab.com/api/graphql',
          headers: { 'Some-Key': 'Some-Value' }
        }),
        // add a second API endpoint...
        {
          id: 'spacex',
          title: 'SpaceX',
          fetcher: async (params: any) => {
            return fetch('https://api.spacex.land/graphql/', {
              method: 'POST',
              headers: { 'Content-Type': 'application/json' },
              body: JSON.stringify(params)
            }).then(res => res.json());
          }
        }
      ])
  })
Rather than using the GraphQLEndpoints.create function to create the GraphQLEndpoint, we creating an an object with a custom fetcher fucntion. This approach allows for more control over constructing the HTTP request to the API. This may be necessary in special cases where the GraphQL endpoint as unique requirements.
The end result is the same though, a new tab for the ‘SpaceX’ API:
Connecting to an authenticated API with GitHub authentication
A special github function is available on the GraphQLEndpoints class. This function allows you to connect to a GitHub-authenticated GraphQL endpoint using the built-in GitHub auth provider. This assumes that you are using the GitHub auth provider in your Backstage implementation.
Adding a GitHub-authenticated API is quite simple. For example, this is how you would setup a connection to the official GitHub GraphQL API:
import {
  AnyApiFactory,
  createApiFactory,
  errorApiRef,
  githubAuthApiRef
} from '@backstage/core';
import {
  graphQlBrowseApiRef,
  GraphQLEndpoints
} from '@backstage/plugin-graphiql'

export const apis: AnyApiFactory[] = [
  createApiFactory({
    api: graphQlBrowseApiRef,
    deps: { errorApi: errorApiRef, githubAuthApi: githubAuthApiRef },
    factory: ({ errorApi, githubAuthApi }) =>
        GraphQLEndpoints.github({
          id: 'github',
          title: 'GitHub',
          url: 'https://api.github.com/graphql',
          errorApi: errorApi,
          githubAuthApi: githubAuthApi
        })
      ])
  })
];
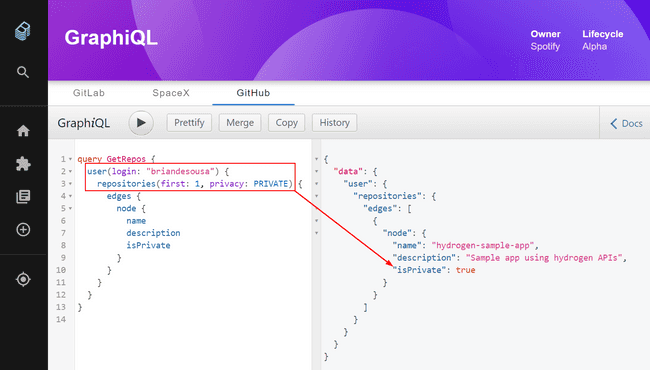
The current user logged into Backstage can now access information that is only available to authenticated GitHub users. For example, the user could query for their private repositories:
The github function even attempts to request additional API scopes if the current user’s authentication token doesn’t have the scopes required to execute the GraphQL query or mutation.
Prefer a no-code Backstage setup?
Become a Backstage expert
To get the latest news, deep dives into Backstage features, and a roundup of recent open-source action, sign up for Roadie's Backstage Weekly. See recent editions.


